
Amy Check received her BA in Psychology from UNLV in 2016. She has worked in Digital Collections since 2013, first as a student assistant, before transitioning to a staff position in 2017. Her previous work includes the National Digital Newspaper Project and the Southern Nevada Jewish Heritage Project.
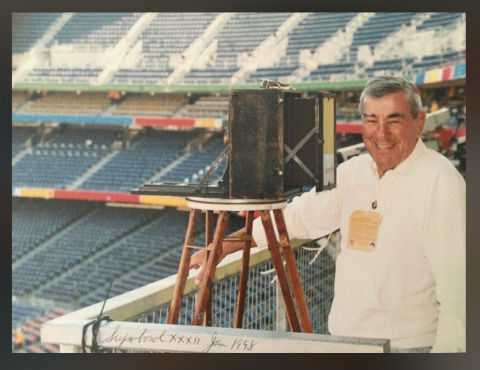
Welcome to the second and final blog post about the UNLV Special Collections & Archives Bob Paluzzi Panoramic Photographs Digitization Project. This post is a follow up to our first blog post from last December titled the “Paluzzi Panoramic Photo Project.” There you will find information about who Bob Paluzzi was, learn about Cirkut cameras, see how the collection was prepped for digitization, and meet the project archivist for the grant.
While the first half of the project was focused around rehousing, physically preparing, and recording metadata for the collection, the second half of the project was primarily focused around digitization. In this blog post, we will cover the entire digitization process for the collection: what materials were used, how items were digitized, and how the final images were created.
The digitization process
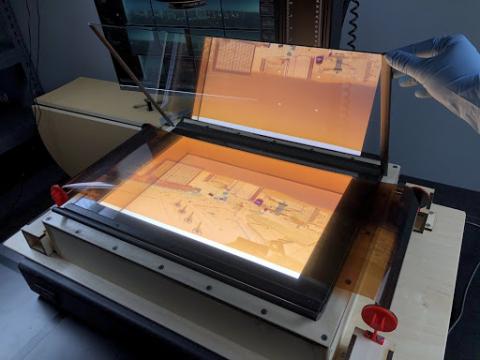
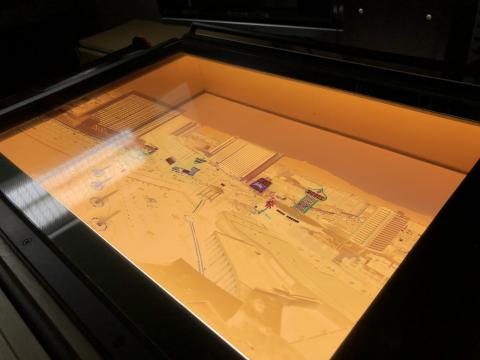
Digitization is the process of taking physical materials and converting them into digital formats. Typically this process is achieved through the use of some type of imaging capturing device, like a flatbed scanner or camera. Although standard scanning equipment has worked well for the many items already digitized in Special Collections, this collection’s film negatives could not be digitized in the traditional way due to their unconventional size. The negatives were too wide and too long to digitize with normal equipment. Measuring on average 10 inches tall and up to 8 feet long, we had to get creative and construct a tool that could both keep the film flat during capturing and handle the film’s long length. The solution was a custom-built negative carrier
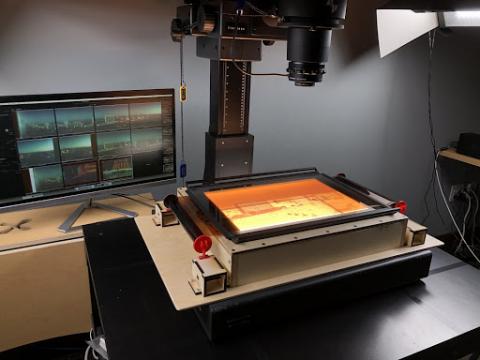
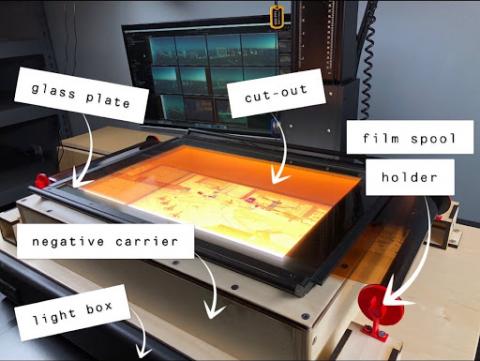
Second in uniqueness only to the actual items in the collection itself, the negative carrier’s base used for digitization was custom-made at Lied Library's Makerspace by our wonderful colleague R.C. Wonderly! The negative carrier is made out of multiple panels of wood that were fit together to mirror the dimensions of our Phase One Rapid Capture System. There is a large cut-out at the top of the negative carrier which allows light from a light box to shine through and illuminate film during capturing. Additionally, there are also two 3D-printed film spool holders on either side of the cut-out to provide physical support for the rolls of film. All of these features allowed us to maintain control over the film negatives while digitally capturing them.
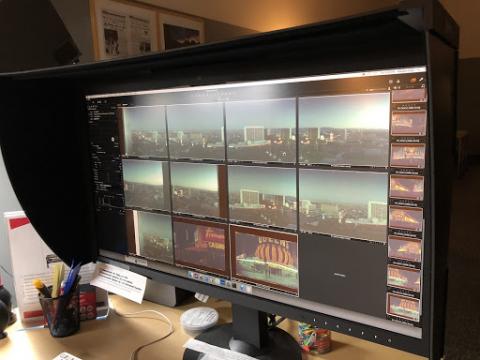
With the negative carrier in place, the process of digitizing the Paluzzi Collection became streamlined. The best method for digitizing the negatives was to capture several separate images of a single roll of film and then use stitching software to combine the images together into a panoramic photograph.
For anyone interested in technicalities, here is a snippet of the Processing Note taken from the collection’s finding aid: “The Paluzzi Panoramic Photographs were digitized using an 11-inch x 14-inch anti-newton ring glass negative carrier and a Phase One Rapid Capture System with an IQ180 80 megapixel digital back and a 72mm Schneider Kreuznach lens. Individual negatives were captured in sections and stitched together electronically using Adobe Photoshop 2021 and Autopano Giga 4.2 software. All negatives were captured at 600ppi at the size of the negative, while medium and large sized photographic prints were captured at 600ppi and 300ppi, respectively.”
And for anyone who is confused by technicalities, here is a brief breakdown to simplify all of the terminology:
- Technological Term = Simplified Term
- 11-inch x 14-inch anti-newton ring glass negative carrier = Glass plate
- Phase One Rapid Capture System with an IQ180 80 megapixel digital back and 72mm Schneider Kreuznach lens = Capturing system and camera
- Adobe Photoshop 2021 Autopano Giga 4.2 software = Stitching software
There was a learning curve at the beginning of digitizing, but through trial and error, we determined the best way to digitize the negatives was the following process:
Steps for digitizing a negative
- Ensure capturing system is ready, light box is on, and surface has been prepped
- Load a roll of film onto a film spool holder, working left to right
- Pull the film across the negative carrier cut-out and secure it onto the other film spool holder
- Place glass on top of film
- Capture first section of film
- Carefully “roll” negative to next section of film
- Capture second section of film
- Repeat capturing process until entire film roll has been digitized
- Stitch together images to create panoramic photograph
- Apply appropriate color correction as needed
The life of a negative
Here is a step-by-step process for digitizing item number PH-00414_133 from start to finish.

The completed collection
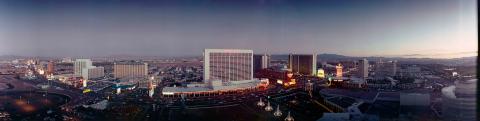
After several months of constant capturing, stitching, and color correction, we finally reached the finish line of the grant! With the ability to sit and look over the collection in its entirety, we could see how varied and unique the photographs truly were. Overall, the collection produced 737 digital files (mostly panoramic photographs) stemming from 23 boxes and 11 flat files. The contents of the images varied widely in both subject and location. To keep things simple, we divided the collection into two main categories: locations within Nevada and images with locations outside of Nevada.

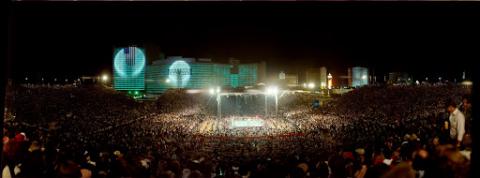
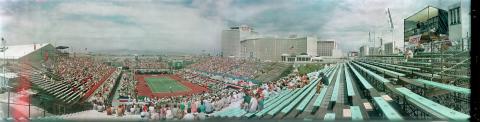
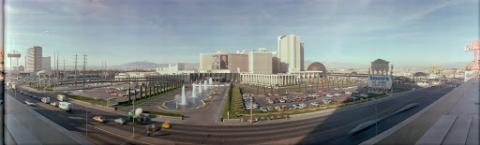
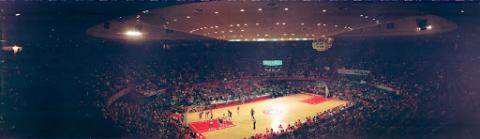
While the whole collection is visually dynamic, the images that document Las Vegas in the late-1970s through mid-1980s are particularly compelling. The locations within Nevada images mainly document the Las Vegas area and consist of 366 digital files dated from 1978 to 1989. Because Robert Paluzzi lived in Las Vegas and worked at Caesars Palace for over 20 years, he was in the perfect position to photograph all of the unique events that were happening in town: boxing matches between star fighters like Larry Holmes and Muhammad Ali at Caesars Palace; hot air balloons taking off at the Tropicana Country Club during the The Tropicana Pro balloon race; college football games at Silver Bowl stadium; and many, many more.
List of subjects found within Las Vegas photos:
- Boxing matches
- Alan King Tennis Classic tournaments
- Grand Prix races
- Conventions and unions
- United States Airforce Thunderbirds
- Classic and antique car clubs
- UNLV football and basketball games
- Las Vegas Stars baseball games
- Las Vegas Strip
- Fremont Street
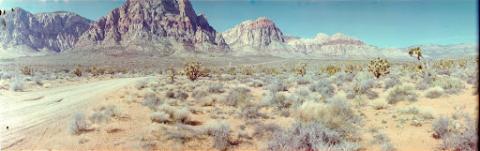
- Desert landscapes around the Vegas Valley
- Reno and Lake Tahoe
Here are a small number of images from the collection that highlight events and locations around Las Vegas. A full listing of all items found within the Bob Paluzzi Panoramic Photographs may be found in the collection’s finding aid.